SQL Server Management Studio is a commonly-used bit of the Microsoft SQL Server install, and a decent enough tool for browsing, querying and managing the data.
Sometimes though you might have the urge to extract a big chunk of data – most often I do this to generate a big text-file dump for import into other data analysis tools. Even when said tools can link and query the SQL server directly themselves I often find it useful to do this to ensure my extract is guaranteed to remain static, portable, fast, local and not subject to the whims of far-away database admins, especially for the larger side of extracts.
There are at least 3 methods to do this. They can all produce the same results but some have more options than others. For simple CSV exports though, take your pick. They work nicely on biggish extracts too – they regularly serve me up datafiles with hundreds of millions of rows and a bunch of columns with minimal stress.
Option 1: Right clicking the data output grid
If you already ran your query such that the results are in the grid output at present, it’s possible to simply right click anywhere on the resulting data and choose “Save results as”.

In the following box you get an option to save what was shown in the grid as a CSV or a tab delimited file.
Quick and easy, but a couple of downsides:
- no option here to customise the delimiter or use fixed width text file format. This is fine with nice regular numeric data, but beware of anything with text in that might have the dreaded extra commas or equivalent within the field contents.
- you need to have already got the results of the query output to the grid. This is fine for small result sets but I don’t especially like to make this happen if it’s going to generate millions of rows (and if it’s really small, then copy and paste to Excel or wherever is another simple option!).
Option 2: Output the query to a file instead of the grid
If you have no need to see the results of the query in the interactive grid, why waste your time? Instead output the results of the SQL directly to a file.
The first thing to do is to go to Query -> Query Options menu. Find the Results -> Text part of the options and check to make sure you are happy with the delimiters, including column headers, max characters etc.

Then, OK on that, and go back to the main SSMS screen.
Then press the toolbar button “Results to file” (or Ctrl + Shift + F) 
Now when you execute your query it will prompt you for a filename. Enter in the name/location of where you want your text file and it will happily churn away until it’s finished generating it.
Of course you can open a new query tab and carry on working if you want to get stuff done whilst waiting for it to complete.
Warning: SQL server is apt to add an annoying “count of records” line at the bottom of extracts performed in this way. This creates a mostly-blank and invalid record as far as any software importing the output is concerned. To stop this happening, make the first line of your SQL query:
“SET NOCOUNT ON“.
Option 3: Use the “data export” task
For the maximum levels of configuration, you can use the SQL Import and Export Wizard to get data out into CSV (or a lot of other things).
For this, in the Object Explorer window, right click on the name of the database concerned. It must be the database name; right clicking the table, columns, keys or elsewhere will not give you the correct options.
From this choose Tasks -> Export Data

It will then open up an Import/Export wizard.
Fill in the name of your SQL server and the database concerned if it isn’t already selected.

Choose the destination for your data. There are many options here, including copying it to another SQL server database if you have one dedicated to analysis or similar. For a CSV style output pick “Flat File Destination”.
Browse to tell it the filename you want it to output. Then make sure the format, column names options and so on are set as you wish. Don’t worry that you can’t change the delimiter itself on this screen, that comes later.

The next screen gives you the chance to copy data from a set of tables of views. But if you have already written some custom SQL then pick the “Write a query to specify the data to transfer” option.
You’ll get blank box which you can type / paste your SQL query in, exactly as you’d run it in the main SSMS environment.
Once that’s done, you’ll get to a screen where you can pick both a row and column delimiter, assuming you plumped for the delimited output type. Leave “source query” as “Query”.

Here you have buttons to quickly preview your data. If you want to perform some basic manipulations, then hit the “Edit Mappings” button first.
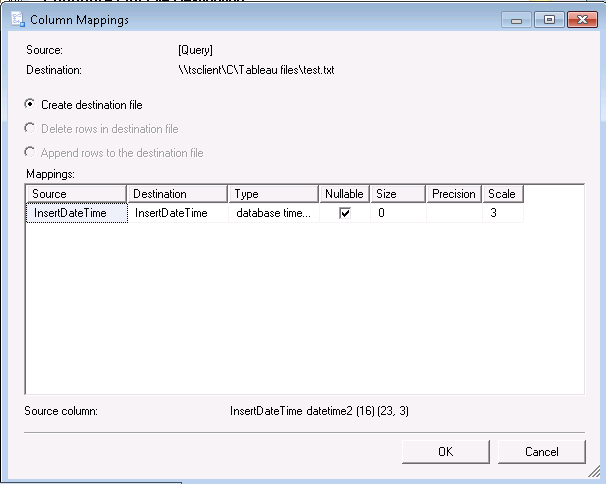
Here you can set options as to whether you want to create a new CSV, or delete/append to an existing one if you happened to pick a filename that already exists.
More interestingly though, you can see all the output fields and their characteristics. Click into the grid to change anything that you don’t like – or if it got the data type wrong (which it does sometimes). If you don’t need the column at all in your output, drop down the “destination” field for that column and chose “”.
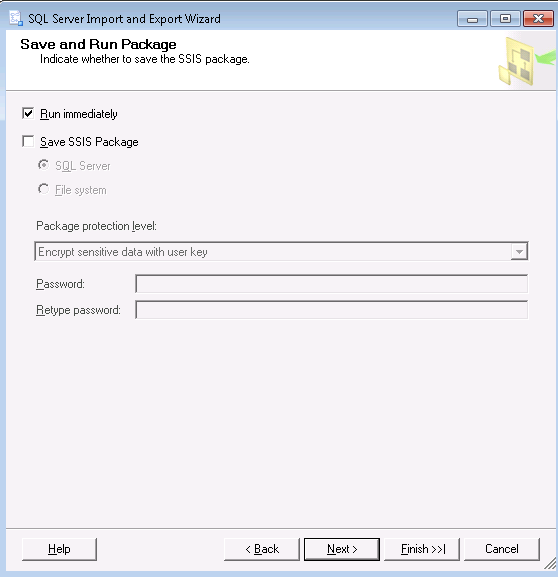
Once you’re done there, you get to the save/run screen. Here you can either chose to run it immediately, or save the job as an SSIS package if it’s something you need to store and run or re-run in future.
Hitting “next” will give you a nice summary of the job you set up. Finally “Finish” will start the job going, assuming that’s the option you asked for. It will list the stages it needs to go through and you can follow whereabouts it is. Note of course if it is a large and complicated query, this stage may take a long, long time.
Hopefully you’ll end up with something like the below, and the file you wanted has been created.

If things aren’t good though, you may get some sort of error message. Of course Google remains everyone’s best friend should these pop up if it is not self-explanatory, but my experience to date has been that most often it is the case that the incorrect field type has been selected (often automatically…) in the above “Edit mappings” stage. Go back and correct it if so.
Which option is best?
Surprise, surprise – it depends on your exact task.
I find option 2 is the one I use the most, as a nice compromise between speed (minimal configuration, mapping etc.) and customisation (you can pick your delimiter etc.).
But if you need any re-mapping or the ability to save the job for the future, you’ll need option 3.
1 is super easy, if you just want to export data that is already on your screen into a classic CSV format.
Bonus pro-tip…make sure your delimited field text doesn’t contain delimiters within its legitimate content!
Most of us have probably had the joy of receiving data in supposed CSV format that started off looking something like this:
| ID | Comment |
|---|---|
| 1 | Your site is nice |
| 2 | Your site is horrible, and I don’t like it |
and was later translated into “CSV” something like:
ID,Comment

1,Your site is nice

2,Your site is horrible, and I don't like it
where the third row above has 2 commas in it – which many programs will interpret as it have 3 columns when in fact it has 2.
People have a surprising propensity to fill their text-fields with commas or even pipes and dollars even when you don’t expect them to – and none of the above export methods have by default (in my experience) reliably escaped them properly to the satisfaction of other analytical tools.
If you are not bothered about keeping those extra characters, then you can just process them out within the query SQL, in which case you’re guaranteed to be safe from this CSV curse.
This for example will replace any commas with spaces.
SELECT REPLACE([name_of_your_field],',',' ') AS name_of_your_field

FROM ....
Of course this solution is no good if you need to keep the delimiter characters as part of your analysis – but if you can live with removing them it works a treat.

right mouse click – only option is copy (and no frkn headers)
LikeLike
You need to right click on the gray square at the top left of the grid (left of the column names and above the row numbers) to get the copy with headers option.
LikeLike
Thanks for a brilliant explanation. Just one question though – When you use the “Select replace” are you actually changing the data in the database or just the results of the “select”?
LikeLike
Hi!
Thanks for the kind comment. Re select replace: that just changes the results of your select query. It won’t affect the underlying data in the database.
Cheers,
Adam
LikeLike
Great Article, please mention for Option 2 that you must change the .rpt extension to .csv in order to open in Excel.
LikeLike
Your information is helpful, but I need to go a step further. I want to run the query within a SQL Server Agent job. No problem there. But, I want the output to be a CSV file, and not a text file. In this way, the csv output can be updated automatically and is available to use as an import file on various applications, automatically or manually.
LikeLike
I would also like to know how to create a csv file in my SQL Server Agent job.
LikeLike
option two is not very practical. The file output to a file extension of .rpt which is not very useful.
LikeLike
Option 3 does provide a means of escaping the CSV curse of delimiters within a data record. When specifying the destination as a flat file, the “Text qualifier” field defaults to , but changing it to the double quote character (“) will help the export wizard recognize strings that contain commas as single records and prevents them from being split during export.
LikeLike